Vehicle diagnosis • Automotive Leather
What do seat cracks and dye transfer suggest?
Automotive leather works under heat, body movement and repeated friction, so seat bolsters reveal problems quickly.
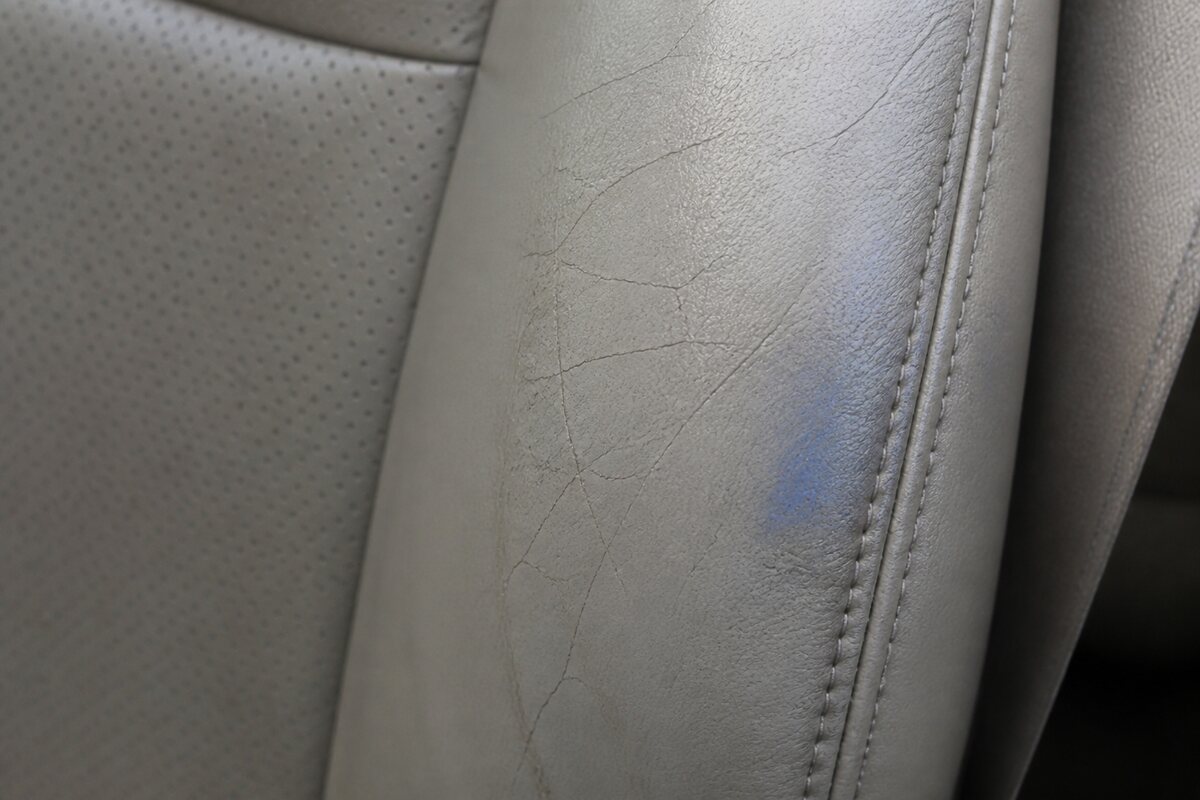
Fine cracks may sit in the finish while deeper splits expose the grain layer or substrate. Dye transfer can be a surface deposit, but aggressive rubbing can remove the protective color that remains.
Inspect the entry and exit of the damage, the flex direction and the surrounding sheen. A treatment chosen only because it works on a household sofa may be wrong for a coated vehicle interior.
Use a small test and a specialist when the airbag, stitching, foam or structural cover is involved.
Two symptoms can occupy the same bolster
A driver's outer bolster is exposed to sliding friction, body weight, heat and clothing contact. Dark dye transfer may sit on top of an intact coating while pale lines show that the coating is thinning or cracking beneath it. Treating the whole area as dirt encourages harder rubbing exactly where protection is already weak. Inspect the deposit and the finish separately, even when they overlap in one photograph.
Compare the entry edge, seat center and passenger side. Repeated darkening at the same contact arc suggests transfer or soil; cracking that follows flex lines points toward finish fatigue and possible material stress. A sheltered area can show the intended sheen and grain, but vehicle panels may use different materials, so the rear panel or door trim is not automatically a valid control for the seat.
Use pressure and moisture sparingly
Begin with the vehicle or seat supplier's current care guidance when available. Test a compatible mild cleaner in a hidden, intact place and allow it to dry. Work with a light-colored cloth so transfer from the seat can be seen. More pressure is not better evidence: abrasion from the cloth can remove a weakened color layer and create a pale patch that is then misread as stubborn contamination.
Perforations require particular restraint because liquid can pass toward foam, heating elements or ventilation structures. Keep seams and holes out of the first test. If the surface color moves, gloss changes sharply or the area becomes tacky, stop. The small product-test method explains how to reduce uncertainty without turning the test into a full treatment.
Map crack depth and seat function
Fine finish checks may remain closed when the bolster is flexed gently. A deeper split can expose a darker grain layer, a light backing or the edge of foam. Record where each line begins and whether it crosses a seam or perforated zone. Do not probe with a sharp tool. A close image under raking light and a second image during ordinary unloaded flex provide more useful evidence than pulling the split open.
Seat construction also sets a stop condition. Side airbags, occupancy sensors, heating, ventilation and restraint-related stitching must remain outside an improvised repair. When the damaged panel includes any of those systems, document it and seek qualified vehicle-interior guidance. The car-seat repair scope keeps safety and structure ahead of color matching.
Choose the least invasive outcome
If a controlled clean removes the transfer and the finish remains stable, the next step may be a gentler maintenance routine and reduced friction at entry. Stable coating loss can call for professional preparation and flexible color finishing. An opening split may need support, fill or panel work. These outcomes cannot be chosen from color alone, and a universal household conditioner does not answer any of them.
Photograph the seat after it has dried, note products already used and set an appearance standard for the whole cabin. A freshly colored bolster may look wrong beside naturally aged adjacent panels if sheen and grain are ignored. The aim is a stable, integrated surface, not maximum contrast between "before" and "after."
Source note: Leather Naturally. Accessed August 25, 2026.